Learning the piano is a very simple process. Like anything in life, when we break a problem down into a step by step solution, we allow ourselves to make simple and gradual progress to our goal while sparing frustration and headaches. This post is directed to someone who has never played piano, knows nothing about piano, and maybe has never even seen a piano. Hopefully if you have stumbled upon my blog while surfing the web for free piano techniques I will be able to motivate you enough to take some simple steps to start achieving your age old goal TODAY! Some of the more advanced players still my find some useful tips in this post as well. Enough with the intro, let’s get started!
Step 1: Learn the Notes on the Piano
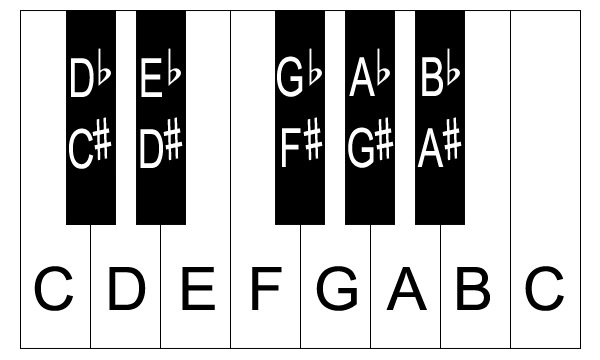
Learning the notes on the piano is the first thing you have to do. This takes a little bit of memorization and a little bit of music theory. Look at the names of the keyboard below.
Now, memorize the notes on the piano however you have to. I have my students play all the C’s on the piano, then play all the D’s and so forth. Create melodies using just the F’s on the piano then maybe just the G’s, then both combine.
Ultimately if I were to ask where the notes C, E, and G are on the piano, you should be able to point them out as if they were your children at a playground…funny I know..but serious too. Now the black notes get a little trickier than the white notes.
There are symbols called flats and sharps in music to describe a certain direction on the keyboard. The sharp symbol is the standard hashtag sign. The flat sign looks like a lowercase “b”. The flats symbol represents a downward movement on the keyboard, (to your left). The sharp symbol represents an upward movement on the keyboard, (to your right).
For example if you wanted to find the note “Gb”, you would simply find the note “G” then move down and to the left to the closest black note on the keyboard. Look at the picture above to help. Like wise to find the note “D#” we simply find the note “D” then move up and to the right to the closest black note. Again, see the picture above to make sure you understand this. That’s it for notes!
Step 2: Sitting at the Piano and Posture
Sitting at the piano is very important and often overlooked. In order to play some more complicated chords you must make sure you have enough room between the piano and your body. When you sit down on a piano bench the first thing to do is fix your posture your not slumped over. Sit up nice and tall so you have control over the keys. The next step is to make sure you have plenty of room between the piano and your body. Most people sit way to close. A good rule of thumb is your elbows should be towards the front of your body when sitting. If they are completely at your sides then you are too close!
Step 3: Proper Hand Position and Playing Notes
This step will become very easy with a couple weeks of repetition. As you place your hands on the piano, you should feel as if you have two oranges or baseballs under each hand. This space is necessary for certain movements, and to create controlled movements in order to play notes. Another checkpoint is making sure your wrists stay nice and flat. You should be able to balance a pepsi can on each wrist. Now for the fun part, playing notes! As we go to play a note with any finger we simply make a small lift then drop the finger into the note. I always describe this action to my students as a mechanical robotic spider! Imagining each finger is one of its legs that moves very cleanly and accurately as it walks!
Step 4: How Do I Play a Piece?
There are number of ways to go about this step. There are pianists that can play pop pieces and jazz because they know a lot of harmony, but technically sound like crap because they never practiced their scales and exercises.
If this level will suffice for you, then simply learn how to construct chords and practice playing them. If you are interested in improvisation and classical pieces at all then you’re going to need to throw in some exercises in order to get your fingers working smoothly.
Scales, scales, scales. I know everyone hates them but they’re an amazing foundation to build from, and they can be fun if presented in a creative way. If you actually want to get to a point where people are impressed with your playing then you’ll need both! But trust me that’s still easy as long as you’re consistent.
Just think, when you practice, it hurts wayyyyy less than going to the gym! That should be motivating to many!
There you have it! Four very very easy steps on your journey towards learning the piano! For everyone that has some experience playing already, my next blog will be geared towards jazz and pop for beginners!
Happy Practicing!
Still feel like your jazz piano practice is scattered?
Most jazz pianists aren’t stuck because they’re not practicing enough — they’re stuck because they’re working on too many disconnected things at once.
The Proficient Jazz Pianist gives you a clear, step-by-step path for mastering the three skills that actually matter:
comping, solo piano, and improvisation.
Instead of random exercises, you’ll know exactly what to practice, in what order, and how it all fits together musically.
Ready for a real path forward?