- Download:
- MP3 Audio33 MB
How to Arrange Your Standards for Solo Piano
- Practice voiceleading your shells through your 2-5-1’s.
- Practice leading your shells through your standards, LH plays roots.
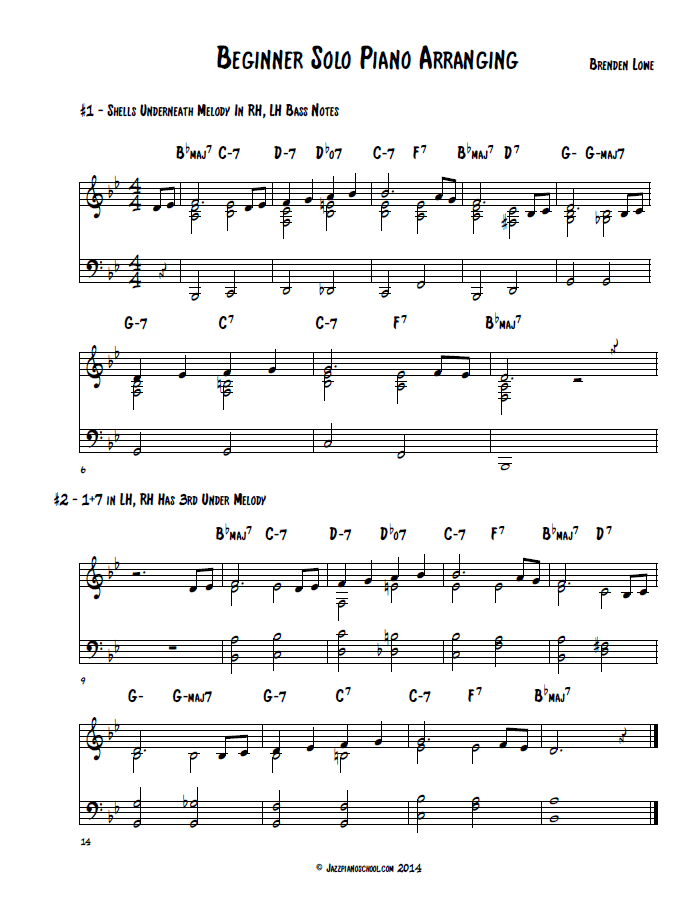
- Arranging Technique #1 – Play your shells underneath the melody note in line with the chord
- Arranging Technique #2 – LH plays 1 + 7 while RH plays melody with the 3rd of the chord underneath.
Video Transcription
Hey everyone, welcome to the Jazz Piano School podcast, episode number 23. I am your host Brenden Lowe and thank you so much for joining me today. I was very upset yesterday and I am going to tell you why right now. I recorded and did my whole podcast and I realized the video that I’m trying to add to the podcast wasn’t recording. So, yesterday was not a great day but I got everything set up now and I am very excited to be doing this because I am going to be adding the midi view and video overhead video shot of the keyboard so that you can see what I am talking about in the podcast. I was just thinking to myself, well, people are probably listening to the podcast and trying to play these things and it must be so hard to visualize this stuff. So rather than just record the podcast for audio, I’ll still put the podcast out there because I’ll be talking about different points, stuff like that and interviews. But for the podcast lessons I’ll be adding the video for the midi so you can see the keys and the overhead shot of the piano. So then you can go to the website. www.jazzpianoschool.com Go into the podcast section and watch the video. If there is anything you want to learn or play, just visually watch me do the lesson while you are listening to the podcast. I think it’s going to be really beneficial, I have all the videos on YouTube as well so you can access them, if you are away from your computer and are on your phone or whatnot. I’m really excited. You are gonna need a lot in this podcast particularly because we are gonna be going over solo piano arranging.
Now, up until this point we have talked about a lot of basic solo piano stuff and we have added some rhythms and bass notes and chords. But we haven’t really talked about how to place your hands, how to arrange the notes in a chord so that it sounds great and it fits with the melody. So that is exactly what we are gonna be doing today. Now, it’s kind of hard and I have to give Becky credit, who is a follower who emailed me, who just found my material. She recommended to do a podcast on the arranging of the notes when going through tunes. That’s what she had been recently working on. Becky, I hope this helps and hopefully it helps other people as well. I know when I first started this was just really, really difficult for me, arranging the notes in a fashion that worked. I was always questioning things, can I do this, can I play it this way? And yes, you can always play it however you like. Obviously there are gonna be better ways to do it so it sounds prettier. Have you ever played a tune and then listened to another person play a tune and think; why, why does their version sound so much better than mine!
One of the things is because of the arranging, it’s how they place the notes. So instead of playing a root position chord in your left hand, which you might be playing, they are taking some of their notes and transferring them to their right hand, so it’s more spread it, it’s more balanced, you are hearing more of a balanced sound. I am going to show you how to do that right now. Before we get into that, I just want to tell you the website is www.jazzpianoschool.com. If you go there you can sign up and become a free member. I am in the process of building a new website, well upgrading the website with a branding and marketing company, by the name of Dreambox Creative. They are great; he was one of my students and he actually owns his own design and branding company. So we are redoing the whole platform. We are gonna make it clean, easy to use, accessible. It’s gonna look phenomenal. It’s gonna have all this material on and it’s just gonna take it to the next level. So I am really excited to do that. So let’s get in to the podcast now. The first thing I want to talk about, I’m gonna do a little talking before I do some demonstrating, just bear with me here, it’s gonna create a really solid foundation for arranging, when you are playing solo piano.
The shells of a chord are very important in harmonies and the shells of any are the 3rd and 7th of any chord. So if I play a C Major 7 Chord, the shells of that chord, E and B are going to make the quality in that chord. The root in the 5th are the two notes that are more like anchors or serve more as the building blocks for the chords while the 3rd and 7th serve more as the colors that make up the chord. So if I change those 3rd and 7th to let’s say a B Flat and an E rather than B Natural and an E it’s gonna change the chord completely, even though the anchors are staying the same, right, now we get a dominant chord. And if I do the same thing with the 3rd, if I change the 3rd and make it E Flat we get a Minor 7th chord. So those 3rd and 7th‘s are very, very important. So we want to be able to play the 3rd and 7th’s and pick them out, out of all the chords in a tune, for any chord that you are doing. So to get comfortable with the 3rd and 7th, what I recommend doing is this exercise and it is great. Now this exercise is going to involve picking the 3rd and 7th out of a chord. It is also gonna involve voice leading the 3rd and 7th throughout a 2-5-1’s. So when you play this exercise you will really get a good, clear understanding of how the harmonies are moving throughout a 2-5-1, throughout the progression of a 2-5-1.
All my left hand is doing is playing the roots so that’s all it’s doing; we are not doing anything else. My right hand on the other hand is going to voice lead the 3rd and 7th. So a 2-5-1 in the Key of C has a chord of D Minor 7, G7 going to C Major 7. So my right hand is going to start with the 3rd and 7th of the 2 chord, my D Minor 7. So, what notes would those be? F and C, right, my D Minor 7 chord, so let’s play that with the root with my left hand. So I have D in my left hand. Now I already have my thumb on my F, so the only notes, in order to voice lead, I need to move are the C and I need to move that down a half step to B. Now I am playing the 3rd and 7th of our G 7th chord but it is flip flopped. So I have the 7th on the bottom now and the 3rd on the top. So I have F on the bottom and B on the top. So I went from the 3rd and 7th of D Minor 7 to the 7 and 3 of G7. Now I want to voice lead my 7th and 3 to my 3rd and 7th of my C Major 7. So the 3rd and the 7th of C Major 7 are E and B. I already have my B from the G chord, so all I need to move is my F down to my E Natural a half step. Ok, so the full progression looks like this.
So I have voice lead my shells through our 2-5-1 progression. Now, I want to go through all the keys and do this and it should be like clockwork right, you shouldn’t have to think about this at all. This is really, really going to help your solo arranging skills in the next step when we look at it in a piece. So I will go to my Key of my F and just show you the same thing.
Again, I am starting on the 3rd and 7th of my G Minor 7, voice leading to C 7 and then down to my F Major 7. Then I go to the Key of B Flat and I do the same thing, right, Key of E Flat, I just keep going through the keys. Now, on the 2 chord I am always starting on the 3rd on the bottom and the 7th on the top, but you want to go through all the keys and flip flop that. So when you start with the 2 chord, when you have the 7th on the bottom and the 3rd on the top then guess what, your 5 chord is going to be flip flopped too. So instead of having your 7th on the bottom of you r chord, you are going to have the 3rd on the bottom. So I am going to start with 7 and 3 on the D Minor and go to 3 and 7 of the G7 and then 7 and 3 of the C Major. So you have two structures that you will go through all the keys with. The first structure is 3rd and 7th on the 2 chord. The second structure is 7 and 3 on the 2 chord. So that way you get all of the shells for every possible way.
Let’s take a look at a piece, let’s take a look at a tune and I’m gonna show you the tune “My Romance” now this is a little bit more of a complicated piece, but I wanted to play something with a lot of melody notes so you can see how you can start to arrange the melody with the shells. Now, as you get more advanced, playing solo piano, you will find that your left hand does less of the work. The majority of your left hand, all the chords you practiced and everything in your left hand is gonna kind of switch over to your right hand. So you want your right and left hand to be able to both play chords. Right, your right hand should just as strong as your left hand playing chords. If it’s not there, then I highly recommend practicing both hands for all of your chords, all of your Major chords. Your Major 7’s, Minor 7’s and your Dominant 7’s.
But, here is “My Romance” So My Romance has a nice little melody and we will probably just do the 8 bars, the first 8 bars today. Ok, so, that’s the first little section of the melody. Now, if I were to approach a piece, let’s say you guys don’t know this, how would I arrange this? How would I get my chords in there with the melody and the bass notes and the rhythms, there are so many things to think about. So the great thing about this system I am about to teach you is that it is going to sound great, it’s going to be easy and it’s going to build a foundation that is going to prepare you for a lot of advance techniques.
So, I don’t want you guessing anymore, what to add, I want you to start to add systematically in the way I am about to explain it. So here we go. Our left hand is only going to have the root, for now, that’s all I want you to start with. Our right hand is gonna have the melody, because we want to be able to play the melody, right. But, where the chords line up with the melody note, I want you to play your shells underneath that melody note. So in “My Romance” there is a little bit of a pickup and so “My Romance” So right when I hit “Mance” is where the first chord comes in, the B Flat Major 7. So I have, so the melody note is F where the B Flat falls on that melody of F’s. So what I want to do is add the two shells of my B Flat Major 7 underneath my melody. Now, I want to add the closest shells underneath the melody so the melody note is F. Now the shells, right, you’ve been practicing your shells, for a little while. You know that the shells of our B Flat Major 7 chord are D and A.
So we want to play the D below the F, there is one of our shells, that’s the 3rd. And we want to play the 7th or the A below that D. So we are playing a Triad right now that consists from the bottom up. A, D and F. So when I hit that melody note with the note F on top I am going to add my two shells so it sounds like a chord. All I am going to play in my bass, in my left hand, is my root.
Alright, so here we go, I will play it really slowly. Right, already, already you can start to hear the piece come alive. All I am doing is adding my shells. Now the reason this sounds so good is because again, the shells is what brings the chord alive. The root in the 5th are just the anchors, the foundations, you don’t necessarily need those to be prominent. But you need those shells close to the melody for those colors to ring out.
So let’s continue with the melody, we will do a couple more chords and figure out the harmony. We have this chord first. Now, the chord change actually moves before there is another melody note. So what do we do in that case? Can you think of it? All we have to do is move our shells with the B Flat Major 7 to the shells of the next chord without changing the melody. So the melody note just stays on F and we are going to move our shells from A and D to the shells of the C Minor 7 chord. This is where our voice leading comes in. We don’t want to jump, right; we want to make sure we move to the closest set of shells for that C Minor 7 chord.
Now, you are probably thinking what are the shells of the C Minor 7 chord, well, the 3rd is the E Flat and the 7th is the B Flat. How do we get to those two notes without jumping? We want to move our A and D as close as possible. They are actually really, really close, right; they are only a half-step away from where we are. So the A slides up to the B Flat and the D slides up to the E Flat.
So all we have to do is slide those two notes to our root and we are golden. Ok, let’s try this, here we go. Did you hear that? You hear that harmony movement and it is so beautiful it just leads into the next chord without even doing anything; we are just changing the shells. Right, so we have our melody and that melody note is arranged with the shells below, the root and the bass. All we do is hold the F and change our shells to match the C Minor 7.
We have our next melody. Did I play that right….no I didn’t. Ok, so our next melody goes up to the F again, but the harmony changes again, so we move up to our D Minor 7 chord. So again, we take the same process guys. It’s the same process over and over and over again. Wherever the harmony lines up with the melody note that’s where we harmonize the shells of the chord underneath the melody. Now, by doing this you are gonna get such a rich sound.
Again, your right hand is working a little bit harder, right, your left hand is just playing roots for now, but I’m gonna change that in the next step. So we want to move our shells from our C Minor 7 to our D Minor 7. So we just moved them. The melody note is F, the F is actually the 3rd now of our D Minor 7. So we are going to be doubling the melody in the 3rd and 7th. So anytime the melody note is a 3rd or a 7th you want to double the melody underneath the melody, does that make sense?
So the melody note is F, which is a 3rd but that doesn’t mean I don’t want to play my 3rd again below the melody note. The melody note is different, right, you kind of, you don’t think of that as being part of the shells. So I am still going to add my 3rd and my 7th below the melody note which happens to be the 3rd in this case. So I am going to add F and C below the melody note which is F. So my chord builds up and it is going to be F, C, F. Let me play these first 2 bars here. Ok, now we are going to do the same thing I just did for the diminished chord. Again, we haven’t talked about diminished 7ths too much yet, but I guess I will do that in the next episode since we have one in this piece. But our diminished 7th chord, the way we make a diminished 7th chord is by taking our dominant 7th chord, our C7 or any dominant 7th chord, I’m gonna use C 7 as an example. We are going to Flat everything except the root.
So I am going to take my C7, the notes C, E, G and B Flat. I am going to Flat all the notes except the root. So I am going to Flat E, turn it to E Flat. I am going to Flat G and turn it into G Flat. I am going to Flat B Flat and turn it into A. So now I have a full diminished 7th chord, D diminished 7th chord. But, in this case we have a D Sharp diminished, excuse me, a C Sharp diminished.
Now diminished chords are usually used as a passing harmony. They are very unstable chords and they like to move. So we use them as passing chords between movements, like they are stepping stones to get from one platform to another, you can think of them as that. So in this case we have our D Minor 7 going down by diminished to our C minor 7’s. So it’s a nice chord to segway the D Minor 7 into the C Minor 7.
Now the 3rd and the 7th of our diminished, I mean the shells, excuse me are still the 3rd in the 7th of the chord basically. In this case, the C Sharp diminished, we are going to have the notes E and B Flat as our shells. So that is going to be under our melody note. Let me start from the beginning here. Here is our B Major 7, C Minor 7, D 7, now here is the C Sharp Diminished. I have A as the melody note, now I want to put the shells of our C Sharp Diminished underneath my melody. Now the shells are going to be E and B Flat. So I am going to put those shells underneath the melody and add my root and my bass. It creates a really nice chord, like a beautiful chord. That resolves to our C Minor 7. I have also the shells below my melody which is the B Flat. So the shells of my C Minor 7 are going to be B Flat and E Flat and my melody note is B Flat on top.
Then the melody note moves down to A, I also have the 3rd and 7th of the chord underneath my A melody note. Then we are back to the F in the B Flat Major 7. So I will play the whole version again guys. All I am doing is adding the shells underneath the melody. This is the simplest way you can arrange beautiful standards and make it sound like you are just way ahead of your game. But you will be by using this technique. I mean you are going to be on a very, very, very advanced level. It is really going to boost your playing into that stratosphere. So here we go.
I would actually play the piece just like that. I don’t need to add anything in; you can play a beautiful melody just by doing that. So that is the first topic, the key that I wanted to give you guys to Solo Arranging today. I mean that if you can master that in pieces, if you can play through a piece, work out the shells, the harmonies. You should practice through pieces just voice leading the shells anyway. Like in this case, in “My Romance” I would practice just my shells, voice leading through all the chords. So I would have B Flat Major 7, so I am playing A and D, that is it. In my right hand and my left hand has the root. Then I voice lead to my next set of shells which is my C Minor, then D Minor 7, now here is my diminished, then my minor.
Now, you will find that your harmony is voice leading will move in kind of a downward motion and that is because everything is resolving down. I resolved down the 5th. Everything is gonna resolve in a downward motion. So sometimes you will need to jump your hand back up when doing that exercise. So just find a good spot at the end of a phrase to jump your hand back up and continue to voice lead.
So after I started from the 7 and 3, at the B Flat Major, I would start at the 3 and 7 and that’s going to give me a new voice leading structure to go through my pieces. So here is the piece again. Ok, so you take on two different structures, because instead of starting on the 7 and 3 I started with the 3rd and 7th.
Alright, so that’s solo arranging, point 1, okay, taking it to the next level. The next thing we can do is start to add in a 1 note in our left hand, ok, that may or may not work in certain times. Now, if you notice, this technique is going to be similar to the first one, but at the same time it is going to be giving you practice in a foundation with your right hand. So it is a really good technique to practice. So in this first case we would play the melody note and voice lead, excuse me, play the shells underneath the melody. So we have 3 and 7 underneath our melody so here is the melody.
In this case my left hand is playing B Flat, my right hand has A and D underneath the melody note. Now, what we can do is we can play 1 and 7 with our left hand, so instead of playing that A Natural with our right hand, we are actually playing it with our left hand. The only note our right hand is going to play in this case is going to be D and the melody note. So we are playing the exact same thing but we are arranging our hands differently. Now this is going to free up my right hand to add more color tones in the future. That is why this technique is so, so important.
When we get into extensions and colors, if your right hand is encumbered with harmony notes that your left hand can take then you are not going to be able to express as many colors as possible on top of the harmonies. So in this case my left hand is going to play 1 and 7 the entire time, ok, so here we go. Here is my melody. So my left hand is playing the 7 of the B Flat Major 7 and my thumb is playing the 3rd and my 3rd finger is playing the melody note. So my right hand has two notes and my left hand has two notes.
As I move to my next harmony my right hand just moves one note and my left hand is still playing the 1 and 7 of the C Minor 7. Then we go to the D minor 7. Now, in this case, since the melody note is an F, we only need to add the 3rd in, excuse me, we only need to add the 7th in below the melody note. You could double your 3rd like we practiced down below. So that’s one technique, like if you move your left hand down an octave, down here, then your right hand can take three notes. But the technique we are currently working on with your left hand always playing 1 and 7, the only thing that the melody needs right now is just the melody because it is the 3rd. So we have 1, 7, and 3. Those are the main notes you need in every single voice leading. You need 1, you need 3 and you need 7. If you have those notes in a voice leading then you are good. You don’t need any other notes. You need the root because that is going to be the foundation and you need the 3rd and the 7th because they are going to dictate the quality of the chord. If you don’t have one of those notes in there then you are missing something.
Always check your voicings to see if you have the 1, 3, and 7 because if you don’t you need to add them in somehow. So in this case my left hand is playing 1 and 7. My right hand is only playing the melody which happens to be the 3rd, so that happens to be all I need. So we have this. Now here, again, my right hand can take the 3rd because our hands are spread out now. So my left hand will have 1 and 7 under the diminished and my right hand will have the melody and the 3rd of the diminished in my 2nd finger. So I have two notes in my left and two notes in my right.
So here it is again. Now again, on the C Minor 7, we have a 7th of the C Minor 7 in the melody note, but since there is room to add 1 and 7 in my left hand on the bottom. Again, this is why it is so visually important to watch this episode guys. This episode more so than others is very, very visually targeted because you want to see where my hands are. But on this melody note I have this 7 and I have room for my left hand to play 1 and 7. Now the 3rd is missing, so all I am going to do is play the 3rd below my melody note with my right hand. My left hand has 1 and 7; my right hand has 3 and the melody note, two notes in each.
Now, it’s time like this where we don’t know where to move because so far our melody, our root motion, this is getting into a little bit more of an advanced topic, has been moving very close, there hasn’t been many jumps. This is our root motion, B Flat, C, D, D Flat, C. So by playing 1 and 7 all the time with my left hand it’s just been going, not much motion, but now in our 2-5-1 we jump from C, the base motion jumps all the way to an F, like in a 2-5. So my left hand is on 1 and 7, so we need to jump to 1 and 7 of F 7. So we are here on the C Minor 7, now, my left hand has two options at this point. This is what I want to talk to you guys about. In a big jump like that we can jump, especially in a 2-5-1 progression, our left hand can go from 1 and 7 to playing 1 and 3 of the next chord, the progression.
The progression is a C Minor 7, its a 2-5-1 to F 7, to B Flat Major 7. So when voice leading my left hand it only makes sense. Remember, we always want the root, the 3rd and the 7th. We can play 1 and 7 in the C Minor. Now we need to get to 1 and 3, so what’s the easiest way to do that? Well, from the C to B Flat, the easiest way to do that is to slide my thumb down to A and play the F up next to the 3rd. So we go from this to this. C and B Flat to F and A. That’s how we voice lead our left hand.
Now we just add the melody, now again, we are missing something because in our left hand we are only playing 1 and 3 and the melody is the 3rd so what do we need? Say it out loud! The 7th!! Ok, so we need 1, 3, and 7. So I am going to have the 7 in my right hand below the melody because that is what we are missing. Right, so we have, and here is the melody note which is F and we are on B Flat, so I can add the 7th in the left hand and the 3rd in my right hand which is D below the melody. So again, my left hand has two notes; my right hand has two notes.
Alright, so that’s arranging step number two. Now, that was kind of complicated, so again, just to recap that. Our left hand is only playing 1 and 7 and usually our right hand has the melody with the 3rd below it. Now you can double notes if you need to. So if the melody note is the 7th then you can double the 7th in your left hand because your left hand will be playing 1 and 7 and add the 3rd in the middle, that’s completely fine. But when you have jumps, let’s say the motion is small, you will stick with 1 and 7 and voice lead your 1 and 7 in your left hand. But when you have 2-5-1’s or jumps, than you want to voice lead those 2-5-1’s from just you left hand, from 1 and 7 to 1 and 3 back to 1 and 7. That’s the pattern for voice leading 2-5-1. So we have 1 and 7 on the two chord, D and B Flat. F and A, the 1 and 3 on the 5 chord and then back to 1 and 7 on the 1 major 7.
So here is the melody with my left hand with 1 and 7, with my right hand with the melody and my thumb on my right hand taking the 3rd below the melody. Sounds pretty good right? Now, by doing this technique, again, it frees up more fingers with the right hand to play color tones. Right, I added a nice little 9 there. Work on those two things, the first step you want to work on is adding the shells below the melody note with your right hand. The only thing your left hand is going to do is add the bass note. Because we always need the bass.
The next step is to have your left hand playing 1’s and 7’s and your right hand will have the 3rd and the melody note. So left hand has 1 and 7 and right hand has 3rd and melody, that’s step number 2. Now when we combine these two steps we can change the texture. Because my bass notes down here are going to sound different than bass notes up here. Right, if I have 1 and 7 up here or just 1 down here and 7 up here, this sounds different than this. So let’s say I want to have my left hand down below with bass notes, but my right hand is going to take the first technique we went through, so shells in my right hand and just bass in my left hand.
Let’s say I start off with that, I can switch my technique now to technique number 2 that we talked about today. So my left hand has 1 and 7 and my right hand has 3 and the melody. By changing the technique it’s going to change the texture, so you are going to get a different contrast, so it is going to sound slightly different. That should be Minor, sorry. So I changed the texture so you could flip flop techniques back and forth and you will get different textures. Sometimes the level that you want to strive for is where you can flip flop back and forth without thinking. So sometimes I will have my melody note with my shells in just my right hand and my bass note in just my left hand. Sometimes I will be voicing my hands where my left hand is playing 1 and 7 and my right hand has the 3rd and the melody.
That’s a really good introduction to solo arranging for piano; now from here we can do a lot of different things. But I am going to take it step by step with you guys so that you can make good progress. We don’t want to go too fast because building a foundation is very, very important. That is what I always teach, I always strive for that with all my students and all my material and the course that I am going to be releasing in the next couple of months with Dreambox Creative, which you guys will be able to sign up for soon, well not soon, but in the next couple of months.
I built such a good foundation with everyone that it just guarantees success; you can’t not make progress by going through these foundational exercises. It leaves room for no holes, so that’s why I love teaching this way because you make faster progress, its expediential, it just curves upward. Otherwise you go up and then down and then up and down and it’s like a rollercoaster if you are not practicing these fundamental concepts and that’s why it seems so important to work on your technique, your harmony and theory and your repertoire and within those three categories, the three categories that I teach in the course, by the end of the year. You are going to get everything you could possibly need in order to make progress and be able to play anything and everything you want at any time.
So, work on your solo arranging techniques. If you want to see the video of how my hands are spread and you can see the midi notes, go to, www.jazzpianoschool.com/jpspodcast/episode23 I know that was confusing. So www.jazzpianoschool/jpspodcast/episode23 and you will be able to see the video of the midi notes and my hands as I am playing, I think it will be very helpful.
I appreciate all of the comments and reviews, it means so much to me and I thank you. We are at 48 stars right now, 5 star reviews, if we could get to 100, I want to throw a party for everyone, I don’t know how I would do that, but I will think of a special gift to giveaway. So if you guys could leave me a 5 star review I would really, really appreciate it. All you have to do, it takes 1 click, well maybe 1 click to get to the rating and then 1 click to actually rate it. That’s it, you don’t have to write anything, it’s two clicks of a mouse and you can help out Jazz Piano School.com, me and everyone else listening and the people that don’t know that this material exists. So if you could do that I would really appreciate it.
Until next time guys, as always, please enjoy the material and Happy Practicing.
If You Enjoyed This Podcast...
Please share it!
All you have to do is click on one of the social media buttons at the top of this page.
Also, if you enjoy all the free jazz piano education we release on a weekly basis, you can show your support by giving the podcast a 5-star rating on iTunes.
Click Here To Give A 5-Star Review On iTunes!
Once you get to iTunes, simply click on the 5 stars to the left and leave your rating.
We appreciate your support!


7 Responses
Hello,
great lesson but…
I think it would be
better if you provided
a lead sheet to follow
the lesson.
Thanks
Hey Jerry,
Absolutely agree. Will get this up tomorrow for everyone. Thanks for leaving a comment! I always appreciate the feedback.
Hello,
Thanks for posting the notation to the lesson.
I just posted a music notation of the
ii – V – I shells in all keys at musescore.com
Musescore is a software that lets you make music notation.
They also have a site musescore.com, that lets you
post the music that you made.
You can also play it and download it and print
a pdf. Check it out.
Here is the link: https://musescore.com/user/226626/scores/240801
Enjoy
Jerry
Jerry that’s so helpful. Thank you so much for taking the time to do this! I recommend everyone check out the link Jerry has posted.
Thanks again!!
Brenden
Excellent presentation Kudos to you with 5 stars and thumbs up.
Very explicit and methodically presented in a well understood manner. Thanks Brenden .Great job.
Thanks for the lesson (one of the many).
Can this be combined with inversions here and there? For example handle the jump of C to F with an unversed F in the left hand (C and F)? Perhaps handle all big jumps like this?
Or does inversions hold disadvantages in the long run, which may not be apparent straight away as a beginner?
Absolutely Sofiane!
I would recommend using inversions when possible. These will usually sound the best! Enjoy!