Everyone always is looking for more jazz piano voicings. Whether its two handed, or one handed, it seems like a jazz pianists is on a never ending journey for more voicings. I can’t say I wasn’t in the same boat at one point in my life. This is how we all start. But if I knew back then, what I did today, I would be much further ahead in my mental approach to voicings. I’m going to share my formula for creating voicings which will allow you to explore and create voicings on your own so you understand them instead of searching on you tube!
Step #1 – The shells are the foundation to jazz piano voicings
If you haven’t done so already, check out my previous blog on How To Use Shells. To quickly review, shells are the 3rd and 7th of every chord. These two notes are the most important notes in any jazz chord we play because they dictate the harmony. Without them, harmonies disappear into the abyss and our playing becomes wishy washy. Within, every jazz chord we play, we will want to include the shells which will give us the two main notes of our chord.
Step #2 – We only have 5 fingers on our LH, so there aren’t endless possibilities
For some reason people always seem to have a surprised reaction to this statement. There aren’t endless possibilities for our LH voicings. We only have 5 fingers and the last time I looked at the piano the notes were the same. This means there are only so many voicings that our LH can play for one more chord. This holds true even if you just starting picking and choosing random notes. You will eventually run out of possibilities. Now that your brain may have accepted this concept let’s look at some of these options.
Step #3 – Our options. A systems approach to creating jazz piano voicings.
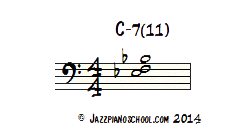
Let’s say we are going to create a LH voicing for a minor 7th chord. From step #1 we know we will need the shells in the chord somewhere. It doesn’t matter where as long as they are inthere, ( for now). Since we know we need the 3rd and 7th in the chord let’s start with the most minimal voicing we can play. Any guesses? Just the shells! We can start with just the shells to a minor7th chord and starting adding in from there. So which notes do we add? Well this depends on what note we pick to be the bottom note. For sake of the system we will assume the bottom note is our shell. So if we are playing a C minor 7th chord, our LH pinky would be playing an Eb. Now, since we have our bottom note being Eb, what is the next closest extension that will work over a C-7 chord. The “traditional” extensions available for our C-7 chord are 7,9, and 11, and 13. Since we are on our third, our next closest note we can add would be the 11, the note F in this case for our C-7 chord. We’ve now created a three note voicing. Eb, F and Bb. Our shells plus one extensions
Step #4 – Switching our 3 note voicing.
In order to systematically create more voicings we now progress our LH voicing by switching the one note we added to the closest note that will work while keeping the same shells. We have Eb, F and Bb, so what would be the closest note we can switch F to? Our 5th. The note G. We now have Eb, G, Bb. Our next three note voicing. Are you starting to see a pattern? We continue to use this system until we move this one note up past our Bb.We are forming three note combinations such as Eb, Bb and C. Eb, Bb, and Eb, Bb, and Eb. Eb, Bb, and F. Some of my students have been able to reach Eb, Bb, and G! I can’t unfortunately.
Step #5 – Creating a 4 note voicing
So after exhausting all our three note possibilities with our shells being Eb and Bb, we would then switch our shells to Bb on the bottom and Eb on the top, rinse and repeat. After that, we have used up all of our three note combos with our shells, which is hard to believe I know. We must add an extra note after this. We add the next possible note we can after the previous note we added which was the F. So in this case we now add our G. We have the notes Eb, F, G and Bb. We now have our new structure from which to move our voicings around.
Step #6 – Move the new voice in our 4 note voicing up
Since we have a new voice in our voicing we just follow the same steps as before and move our new voice up one at a time and create a new voicing out of each of these voicings. In this case our G would move up to an A for our next new voicing. Eb, F, A, Bb. Then our A would move to a C to create Eb, F, Bb, C, and so on until you cannot reach any more notes.

Step #7 – Move the first added voice up 1 voice and move the other voice through all combinations
This is where it usually gets more confusing to people. Once we have moved our new voice up all our possible notes, we just move the original voice we added up 1, in this case, the note F to G, and we repeat the process. So we now we start with Eb G, A, Bb. Now we move our A up all our voices so we create Eb, G, Bb, C, and, Eb, G, Bb, D, and so on until you cannot reach.
Step #8 – Add another voice so we have 5 voices and repeat
Yup, it’s the same thing from here on out. We simply add another cluster and continue to move the new voice up then change the other voices and move the top voice up once more. Remember the shells stay completely the same through out this entire process. Once you have discovered all your new possibilities you switch your shells.
Conclusion
This is a more advanced way of approaching voicings. In the future I will be releasing a voicings guide that will have all of these voicings written out so you won’t need to go through all
the combinations yourself. You’re more than welcome to and I encourage you to do so, but I will be releasing this voicings guide book in the store of the website.
Happy Practing!
Brenden


One Response
Hey Brenden,
That’s a great way to approach finding new voicings. Thanks for sharing!